Wednesday, November 30, 2005

WIldlife Photography hints and tips - Preventing and dealing with dust on the digital camera sensors


This is an enlargement of a portion of sky in an image which shows the effect of dust on the sensor of the camera. Does this look familiar?
Camera manufaturers do not recommend using sticky cleaning pads, and having a camera professionally cleaned is an expensive business, but is all totally avoidable if you follow a few simple precautions that I have described in my wildlife photography hints and tips.

To learn more please click here:
Removing and preventing dust on digital camera sensors

PHOTOSHOP CS TUTORIALS - Use of the clone stamp tool and healing brush


I took this shot of an iceberg in a small boat in the Arctic. Unfortunately, somebody got their red sleeve into the picture just as I took it. Also there are marks in the blue sky caused by dust attracted to the digital sensor in the camera.

I have prepared a tutorial which explains step by step how to use Photoshop's clone stamp tool to remove the unwanted sleeve from the picture and the healing brush tool to repair the sky.

To read my step-by step tutorial on the clone stamp tool and healing brush please click here

To read about other wildlife and nature photography Hints and tips please click here

To read my other Photoshop tutorials for wildlife photographers please click here

Wednesday, November 23, 2005

Tutorial - Adjusting levels and understanding histograms in Photoshop

Do your images look washed out and lacking in contrast ? Chances are you need to adjust "levels" in Photoshop to correct them. Do you understand what the histogram is which you can both see on the back of your camera or in Photoshop image>adjustments>levels ? This is one of the most important tools in the digital photographer's armoury. To view the Ophrys Photography tutorial on Levels adjustments and understanding histograms please click here:
Levels adjustments and histograms
To see other photoshop tutorials, click here :
Tips and Tutorials

Tutorial - Basic image adjustments in Photoshop - Adjusting hue/saturation

Another tutorial - this time in adjustments to hue and saturation in Photoshop. I cover both global and selective colour saturation enhancement using a real worked example of the image above to illustrate the procedure step by step.

To see this tutorial please click here:
Hue and saturation tutorial

Monday, November 14, 2005

Ophrys Photography hints and tips - Photographing Orchids in the Wild


Photographing British wild orchids has been a passion of mine for many years. So this is really my speciality - an area where I think I can impart a lot of knowhow to you!

Orchids are certainly not the easy subjects that you might be forgiven for thinking that they are - after all, they don't fly away like a bird does do they ! However, to achieve shots in the field that could compare with something taken in a studio under controlled conditions is a real challenge as the wee devils constantly nod in the slightest breeze and this movement spells disaster if your aim is a really close up shot. At high magnification this movement looks alarming through the viewfinder!

I have prepared an article under the hints and tips section of the website in which I explain many of the pitfalls and give practical solutions to resolve issues like movement in the wind, camera shake, isolating the subject from the background, making a bland subject have more impact etc.

To read the article please click here:
http://www.ophrysphotography.co.uk/pages/hintsand%20tips2.htm

For the Tips and Tutorials index click here:
http://www.ophrysphotography.co.uk/pages/tipsandtutorials.htm

Friday, November 11, 2005

Tutorial - Sharpening images in Photoshop using the unsharp mask filter


I have added a new Tutorial to the main Ophrys Photography website which covers the use of the USM filter. I have avoided complex technical descriptions of what the sliders do and instead have provided a foolproof method for achieving great results.


To view the tutorial click here:

http://www.ophrysphotography.co.uk/pages/unsharpmask.htm

To view other Photoshop Tips and Tutorials click here:

http://www.ophrysphotography.co.uk/pages/tipsandtutorials.htm

Thursday, November 03, 2005

Removal of " red eye " in Photoshop - Tutorial


"Red eye" - or often "green eye" in the case of many animals occurs when on-camera flash is used at night. The subject's pupils are widely dilated and the light from the flashgun reflects off of the retina at the back of the eye.

Tis is quite straightforward to remove in Photoshop. I have prepared a tutorial describing how to deal with red eye in 5 steps plus some tips to help prevent it in the first place.

To view the tutorial please click here
http://www.ophrysphotography.co.uk/pages/redeye.htm

To view other tips and tutorials please click here
http://www.ophrysphotography.co.uk/pages/tipsandtutorials.htm

Tuesday, November 01, 2005

The art of raw conversion in Photoshop - Tutorial

What is a raw image ?

Many modern cameras have the ability to shoot "raw" images. A raw image is frequently likened to the digital equivalent to a film negative - it is raw camera data and is unreadable unless you use a special programme to access it. The Photoshop software or other raw convertor such as Pixmantec Raw Shooter, Breeze Browser, Capture One etc are examples of such software.

Raw conversion offers much more control over processing of images than jpegs which are automatically processed within the camera parameter settings.
Instead of letting the camera decide settings, you can make much better judgements yourself in the Photoshop raw convertor, which is an integral part of Photoshop CS onwards.
Raw conversion is used by most professional digital photographers, but many people shy awy from using raw because they think it is difficult and offers no real benefits. By working through a real example step by step, I aim to show that the process is not difficult and the benefits are considerable.

I have prepared a detailed tutorial on the main Ophrys Photography website entitled "The art of raw conversion" to describe the steps in converting a real image from a raw file up to a finished image ready for printing.
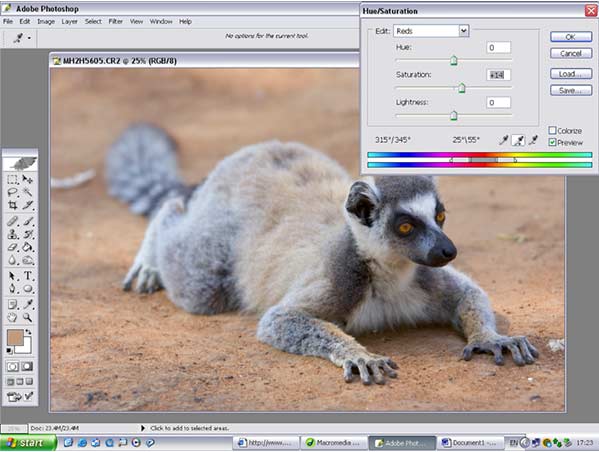
The subject is a rather cute white-footed sportive lemur peering out from it's hole in a tree. I will assume that you have Photoshop CS or CS2 or are using the raw plug-in in Photoshop 7. You may need to download the latest camera software from the Adobe website if you have a very recent make of camera which is not supported in your version of Photoshop .
In the tutorial I will show you how to take the image from this raw file .....

To this image ready for printing...... step by step.

To view the Tutorial "The art of Raw conversion" click here


To visit the Ophrys photography main website please click here

To visit tips/tutorials please click here

To visit a tutorial on raw workflow using the photoshop cs file browser, please click here

For more images of Madagascar - including lemurs, animals, scenery etc please click here

To see my favourite images of lemurs in Madagascar please click here